
For many, an RV is not just a vehicle; it’s a home on wheels and a gateway to adventure. However, like any home, an RV requires maintenance to stay in top condition, with roof repair being among the most critical tasks. Whether you’re dealing with leaks, weather damage, or general wear and tear, understanding how to properly repair your RV’s roof is essential. This comprehensive guide will navigate you through everything you need to know about RV roof repair, ensuring your mobile abode remains safe and secure no matter where your travels take you.
Understanding the Importance of Regular RV Roof Maintenance
Recognizing Signs of Roof Damage
Regular inspections are key to identifying potential issues early on. Look out for signs such as water stains on the ceiling, cracks or splits in the roof’s surface, and loose or peeling sealant.
The Consequences of Neglecting Roof Repair
Ignoring roof damage can lead to more serious problems, including structural damage, mold growth, and decreased RV value. Prompt repairs are crucial to prevent minor issues from becoming major headaches.
Scheduling Routine Inspections
To avoid unexpected repairs, schedule regular roof inspections at least twice a year and after any severe weather events. This proactive approach can help extend the life of your RV roof.
Types of RV Roofs and Their Repair Needs
Rubber (EPDM or TPO) Roofs
Rubber roofs are common in RVs due to their durability and flexibility. Repairing these roofs typically involves patching holes or tears with a compatible sealant or rubber roofing material.
Fiberglass Roofs
Fiberglass roofs offer a smooth, hard surface that’s resistant to damage. Repairs may include fixing cracks with fiberglass resin or replacing damaged sections entirely.
Metal Roofs
Metal roofs are less common but highly durable. Repair work might involve sealing leaks with butyl tape and coating with a protective sealant to prevent rust and corrosion.
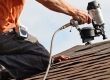
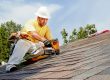
Step-by-Step Guide to DIY RV Roof Repair
Identifying the Scope of Damage
Before starting any repair, thoroughly assess the extent of damage to determine the necessary materials and tools for the job.
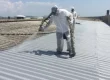
Cleaning and Preparing the Roof Surface
A clean surface is crucial for effective repair. Use a specialized RV roof cleaner to remove dirt, debris, and any old sealant before beginning repairs.
Applying Sealants and Patches
Select the appropriate sealant for your roof type and apply it according to the manufacturer’s instructions. For larger damages, apply a patch that’s compatible with your RV’s roof material.
Selecting the Right Materials for Your RV Roof Repair
Understanding Different Sealants and Coatings
Not all sealants are suitable for every roof type. Research and choose products specifically designed for your RV’s roof material to ensure a lasting repair.
The Role of Roof Repair Kits
Roof repair kits can be a convenient option, providing all the necessary materials for fixing common issues. Make sure the kit you choose is compatible with your RV roof type.
When to Use Patches vs. Coatings
Patches are ideal for repairing physical damage, such as holes or tears, while coatings are best used for preventive maintenance and sealing minor leaks.
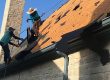
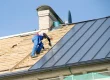
Professional RV Roof Repair: When to Call the Experts
Evaluating the Severity of Roof Damage
Some roof damages are beyond the scope of DIY repairs. If you’re dealing with extensive structural damage or persistent leaks, it’s time to consult a professional.
The Benefits of Professional Assessment and Repair
Professional RV technicians can provide a comprehensive assessment and ensure repairs are done correctly, potentially saving you money on future repairs.
How to Choose a Reputable RV Repair Service
Research and select a repair service with good reviews, proper certifications, and experience with your type of RV roof. Ask for quotes and compare services to ensure you’re getting the best value.
Preventing Future RV Roof Damage
Regular Cleaning and Maintenance
Keeping your RV’s roof clean and well-maintained can prevent many common issues. Regularly remove debris and clean the surface with appropriate products.
Using Protective Covers and Coatings
When not in use, covering your RV can protect it from weather-related damage. Applying a UV-resistant coating can also help extend the life of your roof.
The Importance of Immediate Repairs
Addressing minor repairs promptly can prevent more significant problems down the line. Regularly inspect your roof and fix any issues as soon as they’re discovered.
Common Mistakes to Avoid in RV Roof Repair
Neglecting Regular Inspections
Failing to regularly inspect your RV’s roof can lead to unnoticed damage and more extensive repairs. Make inspections part of your regular maintenance routine.
Using Incorrect Materials
Using materials not designed for your RV’s roof type can cause further damage. Always choose products specifically recommended for your roof material.
Skipping Surface Preparation
Properly cleaning and preparing the roof surface before repairs is crucial for the longevity of the repair. Never skip this step to ensure the best results.
FAQs About RV Roof Repair
What are the first signs of roof damage I should look for?
Early signs of roof damage include water stains on interior ceilings, visible cracks or tears on the roof surface, and loose or peeling sealant around fixtures and seams. Regularly checking these areas can help you catch issues before they escalate.
Can I use any sealant for my RV roof repairs?
No, not all sealants are suitable for every type of RV roof. You must use a sealant compatible with your roof material—whether it’s rubber (EPDM or TPO), fiberglass, or metal. Always check the product specifications to ensure it’s right for your RV.
How often should I inspect my RV roof?
It’s recommended to inspect your RV roof at least twice a year and after any severe weather events. Regular inspections can help identify potential issues early, allowing for timely repairs that can prevent more significant damage.
Conclusion
Roof repair RV is a crucial aspect of maintaining your recreational vehicle’s longevity and ensuring it remains a safe, comfortable haven during your travels. Understanding the different types of RV roofs, recognizing signs of damage, selecting the appropriate materials for repairs, and knowing when to call in professionals are all vital components of effective RV roof maintenance. Regular inspections and maintenance not only extend the life of your RV but also help you avoid the inconvenience and expense of significant roof damage.
By adhering to the steps outlined in this guide, you can tackle the most common roof repair tasks, ensuring your RV remains in top condition. Remember, the key to successful RV roof repair lies in prompt action, using the right materials, and maintaining a routine inspection schedule. Whether you’re an experienced RVer or new to the lifestyle, keeping your RV’s roof in prime condition will enhance your travel experiences and protect your investment for years to come.
As you embark on your RV roof repair endeavors, keep in mind the importance of addressing issues as they arise, consulting with professionals when necessary, and always prioritizing the safety and integrity of your vehicle. With the right knowledge and tools at your disposal, you’ll find that maintaining your RV’s roof is a manageable and rewarding part of RV ownership.