
Embarking on a camper roof replacement can seem daunting at first. However, with the right information, tools, and a bit of patience, you can ensure your camper is protected and ready for adventures for years to come. This comprehensive guide will walk you through the entire process of camper roof replacement, from initial assessment to the finishing touches.
Understanding the Importance of a Solid Camper Roof
The roof of your camper is your first line of defense against the elements. Whether it’s beating sun, pouring rain, or a blanket of snow, the roof ensures your mobile home stays dry and comfortable. Recognizing signs that indicate your camper roof needs replacement is crucial for maintaining your camper’s integrity. Ignoring these signs can lead to more significant issues, such as water damage or structural decay.
Preparing for a Camper Roof Replacement Project
Camper roof replacement is a significant undertaking. Whether you’re considering a DIY project or hiring professionals, understanding the scope, cost, and necessary materials is essential. This preparation phase is critical for setting realistic expectations and ensuring you have everything needed to start the project.
Overview of the Camper Roof Replacement Process
We’ll provide a step-by-step guide to replacing your camper roof, covering everything from the removal of the old roof to the installation of the new one. By understanding what the process entails, you can approach the project with confidence, knowing what steps to take, the time investment required, and the expected outcomes.
Assessing Your Camper Roof’s Condition
Identifying Damage and Wear
Inspecting your camper roof regularly is key to early detection of potential issues. Look for common signs of wear, such as cracking, blistering, or leaks inside the camper. Early detection can often mean the difference between a simple repair and a full roof replacement.
Determining the Extent of Damage
Not all damage requires a complete roof replacement. Assessing the extent of the damage is crucial for deciding whether a repair will suffice or if a full replacement is necessary. This decision will significantly impact your project’s scope and budget.
Documenting and Planning
Keep a detailed record of all damage and plan your replacement process carefully. Setting a realistic timeline and budget based on this assessment will help manage your expectations and prepare for the steps ahead.
Choosing Materials and Tools
Selecting the Right Replacement Materials
The choice of materials for your camper roof replacement is pivotal. Options range from traditional rubber roofing (EPDM) to more modern materials like TPO and fiberglass. Consider the climate, your camper’s specifications, and your budget when choosing.
Gathering Necessary Tools and Equipment
Compiling a list of necessary tools and materials before starting your project can save time and frustration. From utility knives to sealants and rollers, ensure you have all items on hand to avoid interruptions.
Preparing for Unforeseen Challenges
Unexpected issues often arise during camper roof replacement projects. Preparing for potential challenges, such as structural repairs or weather delays, will help keep your project on track.
The Replacement Process: Step by Step
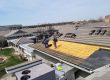
Removing the Old Roof
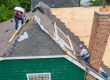
Removing the old roof is the first physical step in the camper roof replacement process. It’s crucial to approach this task with care to avoid damaging the camper’s structure. Wear safety gear and use the appropriate tools to peel away the old material, being mindful of sharp edges and potential hazards like rusted nails or screws. Proper disposal of the old roofing material is essential; consider recycling options or proper waste disposal methods to minimize environmental impact.
Installing the New Roof
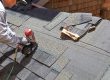
With the old roof removed and the surface prepared, it’s time to install the new roofing material. Starting with a clean, dry, and smooth surface is key to ensuring a successful installation. Follow the manufacturer’s instructions closely for the best results, whether you’re working with EPDM, TPO, or another material. Pay special attention to sealing edges and around fixtures to prevent leaks. A well-executed installation not only protects your camper from the elements but also enhances its overall value and longevity.
Post-Installation Checks and Maintenance
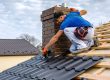
After installing the new roof, thorough checks are necessary to ensure everything is sealed and secured properly. Look for any gaps in the sealant and ensure all edges are tightly affixed to avoid future leaks. Initial maintenance, like applying a UV protectant if applicable, can significantly extend the life of your new roof. Regular inspections, especially after extreme weather conditions, will help maintain the integrity of your camper roof over time.
DIY Tips and Tricks
Overcoming Common DIY Challenges
DIY camper roof replacement can present various challenges, from unexpected repairs to material handling difficulties. Equip yourself with knowledge by researching common issues and how to address them. Online forums, videos, and manufacturer guides can be invaluable resources. Remember, there’s no shame in seeking professional help if a problem exceeds your comfort level.
Cost-Saving Strategies
Replacing a camper roof can be expensive, but there are ways to mitigate costs without compromising on quality. Comparing material prices, buying in bulk, and reusing viable components from your old roof can save money. Additionally, consider performing the replacement in stages if it helps spread out the cost without leaving your camper unprotected.
Ensuring Quality and Longevity
The longevity of your camper roof depends on the quality of materials and the installation process. Don’t cut corners on either. Investing in high-quality materials and following best practices for installation pays off in the long run by reducing the need for repairs and extending the life of your camper.
When to Hire a Professional
Evaluating Your Ability to DIY
Camper roof replacement requires a certain level of skill and confidence. Honestly assess your abilities, tools, and the project’s complexity before deciding to tackle it yourself. If the project seems overwhelming or if making a mistake could lead to significant damage, it might be time to call in the professionals.
Finding and Choosing the Right Professional
Not all professionals are created equal. Look for a service provider with experience in camper roof replacements, good reviews, and transparent pricing. Ask for references and before-and-after photos of previous projects. A trustworthy professional will be happy to provide this information.
Working with Professionals
Clear communication is essential when working with a roofing contractor. Discuss your expectations, budget, and timeline upfront. Stay involved in the project by asking for updates and checking the work done each day. Understanding the payment schedule and warranty terms before work begins will help avoid any surprises.
Maintenance and Care Post-Replacement
Routine Maintenance Tips
After successfully replacing your camper roof, establishing a routine maintenance schedule is crucial for preserving its condition and extending its lifespan. Regularly clean the roof with recommended products to prevent the build-up of debris and mold, which can degrade roofing materials over time. Inspect the roof for any signs of wear or damage, especially after harsh weather conditions, and address them promptly to prevent minor issues from becoming major problems.
Long-Term Care Strategies
Protecting your new camper roof from the elements can significantly impact its durability. Consider applying a protective coating that can reflect UV rays and resist weathering, which will help in preventing premature aging of the roof material. If you’re in an area prone to heavy snowfall, gently remove snow accumulation from the roof to avoid excessive weight and potential damage.
Troubleshooting Common Post-Replacement Issues
Even with a well-executed replacement, you may encounter issues like minor leaks or material wear over time. Identifying the source of leaks early and applying the correct sealant can prevent water damage inside the camper. Stay vigilant for any tears or punctures in the roofing material and repair them according to the manufacturer’s recommendations to maintain the integrity of the roof.
Enhancing Your Camper Roof
Upgrades and Additions
Your camper roof serves as more than just a protective covering; it’s also a platform for enhancements that can improve your camping experience. Installing solar panels can provide a renewable energy source, making your camper more self-sufficient. Consider adding a rooftop air conditioning unit for those hot summer days or a satellite dish to stay connected wherever you are.
Improving Energy Efficiency
An energy-efficient camper is more comfortable to live in and cheaper to maintain. Select roofing materials with high reflective properties to keep the interior cooler in summer. Adding insulation under the roofing material can help maintain the desired temperature inside the camper, reducing the need for heating and cooling. These improvements can lead to significant savings on energy costs and contribute to a more sustainable lifestyle.
Customization and Personalization
Making your camper feel like home extends to the roof. Personal touches such as rooftop gardens or decks can transform your camper into a unique retreat. Always consult with a professional to ensure any additions are safe and won’t compromise the structural integrity or waterproofing of your roof.
FAQs About Camper Roof Replacement
1. How do I know when my camper roof needs to be replaced?
Look for signs like significant leaking, visible damage to the roof material (cracks, holes, tears), sagging in certain areas, or if the roof feels soft and spongy when walked on. Persistent issues despite regular repairs are also a strong indication that it’s time for a replacement.
2. What are the most common materials used for camper roofs?
Rubber (EPDM or TPO), fiberglass, and aluminum are the most common materials used for camper roofs. Each has its advantages and disadvantages in terms of durability, maintenance, installation, and cost.
3. Can I replace my camper roof myself, or should I hire a professional?
This depends on your skill level, the complexity of the job, and your comfort with potentially making mistakes that could be costly. For straightforward replacements, a skilled DIYer can complete the job. However, for more complex situations or if you’re not confident in your abilities, hiring a professional is advisable.
4. How much does it typically cost to replace a camper roof?
The cost can vary widely based on the size of your camper, the material you choose for the roof, and whether you do it yourself or hire a professional. Prices can range from a few hundred dollars for materials alone in a DIY project to several thousand dollars for professional installation.
5. How long does it take to replace a camper roof?
The time frame can vary significantly depending on the extent of the damage, the type of material used, and whether you’re doing it yourself or hiring a professional. A DIY project might take several days to a few weekends, while professional installation can typically be completed in 1 to 3 days.
6. How can I extend the life of my camper roof after replacing it?
Regular maintenance is key to extending the life of your camper roof. This includes cleaning it several times a year, inspecting it for damages or leaks regularly, and promptly addressing any issues. Applying a UV protective coating can also help protect the roof from sun damage.
7. Are there eco-friendly options for camper roof replacement?
Yes, some materials are more eco-friendly than others. For example, TPO roofing is recyclable and considered a greener option compared to other materials. Additionally, adding solar panels during the replacement process can reduce your energy consumption and carbon footprint.
8. Will a new roof improve the resale value of my camper?
Yes, a new roof can significantly improve the resale value of your camper. It not only enhances the appearance but also assures potential buyers that the camper has been well-maintained and is less likely to have leaks or other related issues.
9. Do I need to do anything to prepare my camper for roof replacement?
Yes, preparing your camper can make the replacement process smoother. This includes cleaning the roof, removing any accessories or attachments, and ensuring the interior is protected from debris or dust. If you’re having the work done professionally, ask the service provider if there are specific preparation steps they recommend.
10. What warranty should I expect with a camper roof replacement?
Warranty terms can vary depending on the materials used and whether the installation was done by a professional or as a DIY project. Professional installations typically come with a warranty for both materials and labor, which can range from a few years to a lifetime for the materials and 1-5 years for labor.
Conclusion
Embarking on a camper roof replacement journey marks the beginning of a significant commitment to the longevity and safety of your mobile home. Throughout this guide, we’ve traversed the essentials—from the initial assessment and choosing the right materials to the intricacies of the installation process, whether undertaken as a DIY project or with the help of professionals. We’ve also explored the vital maintenance practices post-replacement and the exciting possibilities of enhancing and personalizing your camper roof for improved functionality and energy efficiency.